Building a blog with VuePress
My story of building my blogpage with VuePress
Building my blog with VuePress
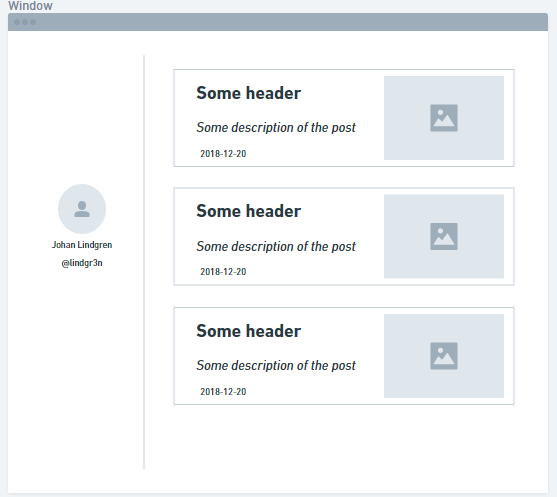
Lets set our basic design using Whimsical — The Visual Workspace Awesome wireframe making tool!
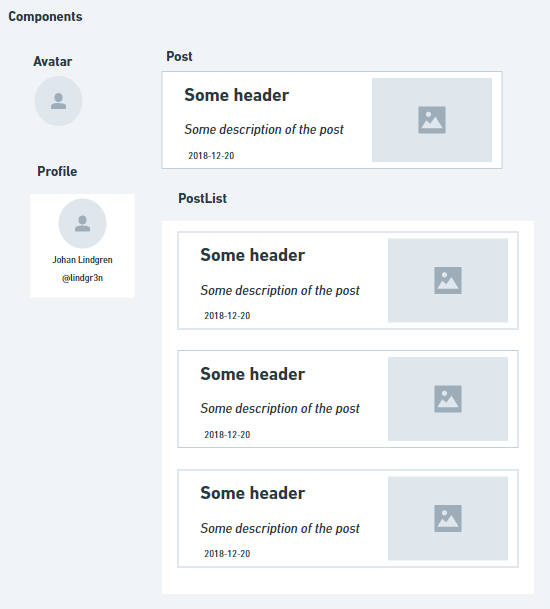
A few trainstops later (like 20min) wireframe with component definition

Components

::: tip This is a tip :::
{{1+1}}
So where to go now... VuePress lets see how far we can go just using the documents.
Lets create a new folder, set up new npm project (And ignore node modules) and set up git
mkdir lindgr3n-blog
cd lindgr3n-blog
npm init -y
echo node_modules/ > .gitignore
git init
git add .
git commit -m"Init"
Now we add vuepress Note: documentation recommends yarn so ill go with it
yarn add -D vuepress
Create docs folder
mkdir docs
Add the scripts to start vuepress
"scripts": {
    "docs:dev": "vuepress dev docs",
    "docs:build": "vuepress build docs"
  }
Create a README.md inside docs folder. Because VuePress needs it to work. Please tell if there is a way to ignore it?
Now we can look over the directory structure
.
├── docs
│   ├── .vuepress (Optional)
│   │   ├── components (Optional)
│   │   ├── theme (Optional)
│   │   │   └── Layout.vue
│   │   ├── public (Optional)
│   │   ├── styles (Optional)
│   │   │   ├── index.styl
│   │   │   └── palette.styl
│   │   ├── templates (Optional, Danger Zone)
│   │   │   ├── dev.html
│   │   │   └── ssr.html
│   │   ├── config.js (Optional)
│   │   └── enhanceApp.js (Optional)
│   │
│   ├── README.md
│   ├── guide
│   │   └── README.md
│   └── config.md
│
└── package.json
So reading around a bit the way to go is to build a custom layout. Because i want it to look like my wireframe
So create a folder .vuepress inside docs/ and inside it create a folder theme with Layout.vue
<template>
  <div>
    Custom page!
  </div>
</template>

<script>
  export default {

  }
</script>

<style scoped>

</style>
Looks good! Well just a simple page with the text "Custom page!"" :)
From the Writing a theme | VuePress documentation we find that displaying content from a .md file we can use a global component <content>
Lets start thinking about the structure about the page. Ill save my post inside a folder named posts/ inside docs/ folder.
So my structure is something like this now
.
├── docs
│   ├── .vuepress (Optional)
│   │   ├── components
│   │   └── theme
│   │       └── Layout.vue
│   │
│   ├── README.md
│   └── posts
│       └── 2018-12-20-First_post.md
│
└── package.json
Where the content of 2018-12-20-First_post.md is
---
title: First post
---
Wohooo woot?
But how do we get the data from the md files? Well when we start the application all .md files inside docs/ folder is processed.
Lets try ut by changing our Layout.vue page
<template>
  <div>
    {{$site}}
  </div>
</template>

<script>
  export default {

  }
</script>

<style scoped>

</style>
Here $site contains all the data processed like pointed out in Writing a theme | VuePress
So in this case we will see
{
  "title": "",
  "description": "",
  "base": "/",
  "pages": [
      { "key": "v-458aeeda248d5", "path": "/", "frontmatter": {} },
      { "key": "v-efe1306789f17", "path": "/posts/2018-12-20-First_post.html", "title": "First post", "frontmatter": { "title": "First post" } }
  ],
  "themeConfig": {}
}
Nice!
With this we can extract the data that have a path to our posts/ folder Updating my Layout.vue
<template>
  <div>
    <div>Sidebar</div>
    <div>
      <div v-for="post in posts" :key="post.key">{{post}}</div>
    </div>
  </div>
</template>

<script>
  export default {
    computed: {
      posts() {
        return this.$site.pages.filter(post => post.path.indexOf('/posts') === 0)
      }
    },
  }
</script>

<style scoped>

</style>
The result is only the posts we want!
{ "key": "v-311e28cecbdd8", "path": "/posts/2018-12-20-First_post.html", "title": "First post", "frontmatter": { "title": "First post" } }
Lets add another posts and refresh. Voila!
{ "key": "v-311e28cecbdd8", "path": "/posts/2018-12-20-First_post.html", "title": "First post", "frontmatter": { "title": "First post" } }
{ "key": "v-8ba3e6dcb3212", "path": "/posts/2019-12-20-Second_post.html", "title": "Second post", "frontmatter": { "title": "Second post" } }
Coolers! 💯 👌
So lets see if we can structure it a bit by make some components according to the components definition.
So create a component
components/Post.vue
<template>
  <div>
    {{post}}
  </div>
</template>

<script>
  export default {
    props: {
      post: {
        type: Object
      }
    }
  }
</script>

<style scoped>

</style>
and update our Layout.vue to use our new component
<div v-for="post in posts" :key="post.key"><Post :post="post" /></div>
And we get the same result! Note that components inside components folder gets global accessible 👍
Welcome tailwind!
Well a layout dont realy look so good without some css!
Will implement tailwind here to be used.
Install tailwindcss and init it Installation - Tailwind CSS
yarn add -D tailwindcss
npx tailwindcss init
It also works so that if you dont have it installed it will automaticly download it (but not save it).
This will create a configuration file for tailwind. Containing all you need for your project ready to be customizated if needed.
For structural purpose i create a tailwind folder and move my tailwind.js into it.
Here you can either just use the tailwind cli to build the style file or you can process it using PostCss.
Ill go for the PostCss way. Here i found the excellent article Build a Beautiful Website with VuePress and Tailwind.css - DEV Community 👩💻👨💻 by Jen Looper (@jenlooper) | Twitter 👍
So the first thing we need to do it install some dependencies needed by vuepress
$ yarn add -D autoprefixer postcss-imp
ort postcss-loader
Next we create a tailwind style import inside docs/.vuepress/theme/styles/theme.styl
Copy paste the content from Installation - Tailwind CSS or the current below. (The link have comments explaining what each part does)
 @tailwind preflight;
 @tailwind components;
 @tailwind utilities;
So next we need to trigger the postCss. That we can by creating a config file insed docs/.vuepress/config.js
var tailwindcss = require('tailwindcss');
module.exports = {
  postcss: {
        plugins: [tailwindcss('./tailwind/tailwind.js'), require('autoprefixer')],
    },
}
So almost done!
Last thing we need to do is to load our css inside our Layout. Update our style tag to import the style file.
<style lang="stylus">
    @import './styles/theme.styl';
</style>
Restart the dev server and... nothing have change?! Well ofcourse we dont have any stylse set yet! :D
So update the Layout with a base example from What is Tailwind? - Tailwind CSS
<template>
  <div>
    <div>
      <div class="bg-white mx-auto max-w-sm shadow-lg rounded-lg overflow-hidden">
        <div class="sm:flex sm:items-center px-6 py-4">
          <img class="block h-16 sm:h-24 rounded-full mx-auto mb-4 sm:mb-0 sm:mr-4 sm:ml-0" src="https://avatars2.githubusercontent.com/u/24882614?s=460&v=4" alt="">
          <div class="text-center sm:text-left sm:flex-grow">
            <div class="mb-4">
              <p class="text-xl leading-tight">Johan Lindgren</p>
              <p class="text-sm leading-tight text-grey-dark">@lindgr3n</p>
            </div>
          </div>
        </div>
      </div>
    </div>
    <div>
      <div v-for="post in posts" :key="post.key"><Post :post="post" /></div>
    </div>
  </div>
</template>
And yey :clap: 🦅
